Irrigation settings
The following settings are required to configure the irrigation program:
- Assigning valves to valve groups
- Valves simultaneously
- Calibrating the EC and pH sensors
- Flow sensor (if a litre counter is used)
Before you can start using the irrigation program, you need to set the irrigation volume, duration and starting conditions. See Irrigation control for more information.
Assigning valves to valve groups
The irrigation program works based on valve groups. A valve group consists of one or more valves including the start conditions and irrigation settings set for those valves.
To assign valves to a valve group, navigate the following path (for each valve group):  .
.
- Tap the Assign Valves to Valve Groups icon ‘
 '. A pop-up window appears.
 - Select the valves that you want to assign to the valve group by tapping them. A white border appears around the selected valves.
- Tap confirm ‘
 '.
'.
You have assigned valves to a valve group.
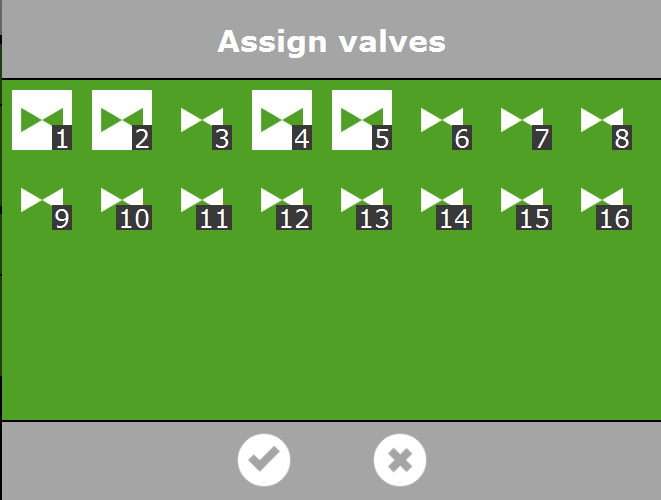
Figure 46: Assigning valves
The irrigation program enables you to use a separate valve group for each valve.
Valves simultaneously
Use the Valves simultaneously setting to specify how many valves may open simultaneously. To get to this setting, navigate this path:  .
.
- Tap the Valves simultaneously setting. A pop-up window appears.
- Enter the number of valves.
- Tap confirm ‘'.
You have set how many valves may open simultaneously.
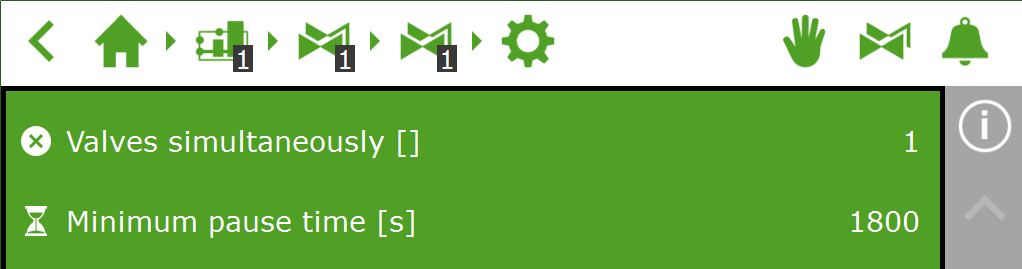
Figure 47: The Valves simultaneously setting
Calibrating the EC and pH sensors
Each EC and pH sensor needs to be calibrated individually. The sensors also need to be recalibrated regularly to continue to ensure accurate measurements. A pH sensor needs to be recalibrated once every six months and an EC sensor once every twelve months. You should also recalibrate a sensor if measurement deviations are detected using a secondary sensor, called a 'monitor sensor'.
The calibration process requires special calibration solutions. To calibrate an EC sensor, you will need EC 1.4 and EC 5.0 solutions. To calibrate a pH sensor, you will need pH 7.0 and 4.0 solutions. The order in which the solutions need to be used is fixed and may not be reversed.
| EC | pH | |
|---|---|---|
| Calibration | Every twelve months | Every six months |
| Calibration solution | 1.4 and 5.0. | 7.0 and 4.0. |
Calibration steps for EC sensor
The calibration process involves a few simple steps; the controller will describe the steps that you need to carry out.
To calibrate an EC sensor, navigate this path:  .
.
- Select the sensor (1 or 2). A pop-up window appears.
-
Start calibration.
Tap confirm ‘
'. -
Place sensor in EC 1.4.
Tap confirm ‘
'. -
Measure EC 1.4.
Stir the sensor during the wait time so that the liquid remains homogeneous.
-
Measurement complete.
Tap confirm ‘
'. -
Place sensor in EC 5.0.
Tap confirm ‘
'. -
Measure EC 5.0.
Stir the sensor during the wait time so that the liquid will remain homogeneous.
-
Measurement complete.
Tap confirm ‘
'. -
Save calibration values.
Tap the save icon ‘
 '.
'.
You have calibrated the sensor. The system will display the correct measurement values.
The measured values are not displayed during the calibration process, as the values are still fluctuating. A readout will appear in the step between the two calibration solutions. This readout may differ slightly from the final value, as the calibration process is not yet complete. However, this intermediate value will provide an indication of the measured value at that time.
Calibration steps for pH sensor
The calibration process involves a few simple steps; the controller will describe the steps that you need to carry out.
To calibrate a pH sensor, navigate this path:  .
.
- Select the sensor (1 or 2). A pop-up window appears.
-
Start calibration.
Tap confirm ‘
'. -
Place sensor in pH 7.0.
Tap confirm ‘
'. -
Measure pH 7.0.
Stir the sensor during the wait time so that the liquid remains homogeneous.
-
Measurement complete.
Tap confirm ‘
'. -
Place sensor in pH 4.0.
Tap confirm ‘
'. -
Measure pH 4.0.
Stir the sensor during the wait time so that the liquid will remain homogeneous.
-
Measurement complete.
Tap confirm ‘
'. -
Save calibration values.
Tap the save icon ‘
'.
You have calibrated the sensor. The system will display the correct measurement values.
The measured values are not displayed during the calibration process, as the values are still fluctuating. A readout will appear in the step between the two calibration solutions. This readout may differ slightly from the final value, as the calibration process is not yet complete. However, this intermediate value will provide an indication of the measured value at that time.
Setting up flow sensor
If the irrigation unit is equipped with a litre counter, you will need to set the 'K-factor' (pulse/litre). The value to be set for the K-factor depends greatly on how and where the sensor has been installed. Follow the instructions provided with the sensor to install the sensor correctly and to determine the K-factor.
To set the K-factor, navigate this path:  .
.

Figure 48: The set K-factor